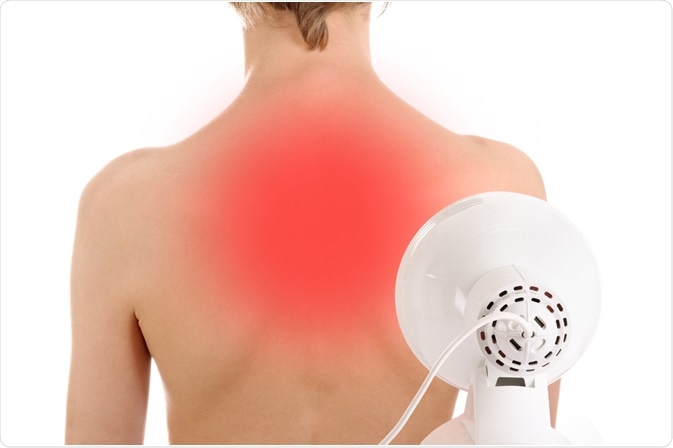
Place the lamp 6 to 12 inches away, treat 10 to 20 minutes, 3 to 5 times weekly.
If you want real relief at home, this guide is for you. I have used panels, lamps, and pads for years with clients and on myself. You will learn How To Use Infrared Light Therapy At Home the right way. We will cover gear, dose, safety, and plans you can start today.

What Is Infrared Light Therapy?
Infrared light therapy is gentle light that you cannot see. It gives your cells a small boost of energy. This process is called photobiomodulation.
Red light sits in the 620 to 700 nanometer range. Near infrared sits in the 700 to 1100 range. Both can help cells work better. The light may help your mitochondria make more ATP. It may also help blood flow and reduce oxidative stress. Many home devices blend red and near infrared LEDs.
Strong reviews and clinical trials show it can ease joint pain, improve skin, and support recovery. Results are dose and device dependent. You still need patience and a plan. This guide shows How To Use Infrared Light Therapy At Home with clear steps.

Benefits You Can Expect And Limits To Note
What it may help:
- Joint and muscle pain. Many users feel less pain and stiffness.
- Workout recovery. It can reduce soreness and speed return to training.
- Skin tone and texture. It may help fine lines and redness.
- Wound healing support. It may aid blood flow and tissue repair.
- Sleep quality. Gentle evening use can calm the body.
What it will not do:
- It is not a cure for all pain.
- Results can be slow. Expect weeks, not days.
- It works best with movement, sleep, and good food.
Evidence notes:
- Trials show better pain scores in knee osteoarthritis and tendinopathy.
- Studies report skin changes like fewer fine lines and better collagen markers.
- Benefits follow a dose window. Too little or too much can underperform.
This is practical health support. It is not a magic fix. You will learn How To Use Infrared Light Therapy At Home to match your goals and get safe, steady gains.

Safety First: When To Be Careful
Start slow and be smart. Here is a simple safety check:
- Shield your eyes. Use the goggles that come with your device. Near infrared can heat the retina.
- Heat care. If you have neuropathy or poor feeling in the skin, test with short, cool sessions.
- Photosensitive meds. If you take drugs that increase light or heat sensitivity, speak with your doctor.
- Active cancer. Do not treat over known tumors unless your oncologist approves.
- Pregnancy. Avoid direct use over the belly and chest. Ask your care team first.
- Thyroid. Keep sessions short and at a distance unless guided by a clinician.
- Kids. Use only with pediatric advice and with strict time and distance rules.
- Skin checks. Do not use over open infection, active bleeding, or sunburn.
If you ever feel heat, burning, dizziness, or vision changes, stop and reassess. When in doubt, ask a clinician. You can still learn How To Use Infrared Light Therapy At Home, but do it with care.

Choose The Right Device For Home Use
Your results depend on your device and dose. Use these tips:
- Wavelengths. Look for 630 to 670 nm red and 800 to 880 nm near infrared.
- Irradiance. Aim for about 20 to 100 milliwatts per square centimeter at the target distance.
- Coverage. Panels for large areas. Handhelds for small spots. Wrap pads for joints.
- Build and safety. Choose devices with clear specs, eye shields, and a good warranty.
- Beam angle. Narrow beams can feel intense. Wide beams feel softer and cover more.
- LEDs vs lasers. LEDs are fine for home use and cover more area with less cost.
- Extras. Pulsing is not required. A simple steady mode works for most goals.
Confirm honest specs. If a brand cannot share distance and output data, skip it. A good device makes How To Use Infrared Light Therapy At Home far easier and safer.
How To Use Infrared Light Therapy At Home: A Step‑By‑Step Plan
Use this simple plan the first month:
- Prep your skin. Clean and dry the area. Remove makeup or thick creams.
- Set distance. Start 8 to 12 inches from the device for panels. For pads, a snug fit is fine.
- Pick mode. Use steady light. Choose red for skin. Use near infrared for deeper tissues.
- Time it. Start with 5 to 8 minutes per area. Build to 10 to 15 minutes as you tolerate.
- Frequency. Use 3 to 5 days per week. Take at least 1 rest day weekly.
- Breathe and relax. Keep the area still. Slow nasal breaths help you feel calm.
- Hydrate. Drink a glass of water before and after.
- After care. Do not apply harsh actives right away. Gentle moisturizer is fine.
- Track. Note pain, sleep, and function. Photos help for skin changes.
- Adjust. If you feel heat or a flare, increase distance or time off the light.
Follow this plan and you will know How To Use Infrared Light Therapy At Home with confidence.

Dosage Made Simple: Distance, Time, And Energy
Dose is about energy delivered to your skin. Here is a quick guide:
- Skin goals like tone or lines. Aim for 3 to 6 joules per square centimeter.
- Deep goals like joints or muscles. Aim for 10 to 30 joules per square centimeter.
Simple rules that work:
- Lower irradiance for longer can be gentler for skin.
- Higher irradiance for shorter can help deep tissue.
- There is a sweet spot. More is not always better.
Easy examples:
- A panel at 50 milliwatts per square centimeter for 10 minutes gives about 30 joules per square centimeter at the surface. Back up if skin goals. Move closer for joint goals, but shorten time.
- A pad on the knee for 15 minutes can match a mid dose since it touches the skin but runs cooler.
Watch your body. The right dose feels warm at most, never hot. These simple checks make How To Use Infrared Light Therapy At Home safe and effective.

Goal‑Based Protocols You Can Try
Pain Relief And Stiff Joints
- Use near infrared or a red plus near infrared mix.
- Distance 6 to 12 inches for panels or direct contact with a pad.
- Time 10 to 20 minutes per area, 4 to 5 days per week for 4 to 8 weeks.
Muscle Recovery And Performance
- Use near infrared before or after training.
- Time 8 to 12 minutes per large muscle group.
- Use 3 to 4 days per week. Do not overdo it on rest days.
Skin Rejuvenation And Redness
- Use red light with gentle intensity.
- Distance 12 to 18 inches for panels.
- Time 5 to 10 minutes, 3 days per week for 8 to 12 weeks.
Sleep And Relaxation
- Use low intensity in the evening.
- Treat chest or back for 8 to 10 minutes.
- Avoid bright overhead lights after.
Wound Care Support
- Only on clean, closed wounds unless guided by a clinician.
- Short sessions 3 to 5 minutes near the area, not on an active infection.
- Stop if the area feels hot or looks more red.
Use these as a base. Tweak based on your notes. This is the heart of How To Use Infrared Light Therapy At Home with purpose.

Common Mistakes To Avoid
Avoid these easy traps:
- Sitting too close. Heat can spike and slow gains.
- Marathon sessions. Long times can blunt effects. Short and steady wins.
- Treating over makeup or thick creams. These can block light.
- Chasing daily use with no breaks. Your body needs recovery.
- Ignoring eyes. Always protect them with near infrared panels.
- Skipping notes. You cannot improve what you do not track.
From my early days, I sat 3 inches from a strong panel. My skin felt hot and tight. My sleep got worse. I backed up to 12 inches and cut time in half. Results came back in a week. Learn from my miss. It will speed up How To Use Infrared Light Therapy At Home the right way.

Track And Optimize Your Results
Make it simple:
- Use a short weekly check. Pain score, step count, and sleep hours.
- Take front and side photos for skin every two weeks in the same light.
- Note training loads and soreness after workouts.
How to adjust:
- If you see small steady gains, keep the plan.
- If you stall, change one variable. Add distance, trim time, or shift days.
- If you flare, pause for 48 hours. Restart at half time and more distance.
These small loops help you master How To Use Infrared Light Therapy At Home and keep progress steady.
Buying Checklist And Budget Tips
Before you buy, check:
- Clear specs for wavelength and irradiance at a known distance.
- Build quality, return policy, and at least a one year warranty.
- Safety features like eye shields and cool operation.
- Size that fits your goal. Panels for full body. Pads for joints. Handhelds for spots.
- Noise and heat levels you can live with.
- A quality pad can beat a cheap large panel if your main goal is a knee or elbow.
- Skip fancy apps and pulsing if that strains your budget. Steady mode works.
- Start small, learn your dose, then scale up if you need more coverage.
With the right gear, How To Use Infrared Light Therapy At Home gets simple and repeatable.
Frequently Asked Questions of How To Use Infrared Light Therapy At Home
How soon will I notice results?
Some feel relief in one to two weeks. Skin and tendon changes often need six to twelve weeks.
Can I use it every day?
You can, but most people do well with 3 to 5 days per week. Build in rest days to avoid overdoing dose.
Should I use red, near infrared, or both?
Use red for skin. Use near infrared for muscles and joints. A mix works well for most people.
What time of day is best?
Use it when you can be consistent. Evening sessions can relax you. Avoid bright light near bedtime if you are light sensitive.
Does clothing block the light?
Yes, fabric blocks most of it. Treat bare skin, but keep it clean and dry.
Is heat required to get benefits?
No. Gentle warmth can happen, but the effect comes from light, not heat. If it feels hot, back away.
Can I combine it with creams or actives?
Use gentle moisturizer after. Avoid strong acids or retinoids right before a session to prevent irritation.
Conclusion
Infrared light is simple, safe, and useful when done right. Start with clear goals, the right device, and a steady plan. Track small wins and adjust your dose with care.
You now know How To Use Infrared Light Therapy At Home without guesswork. Pick one area to treat this week. Set a timer. Take notes. Share your results and questions, and subscribe for more step by step guides and tools to support your routine.